MG2813 Push Pull Mortise Lock


Request a Quote
Features
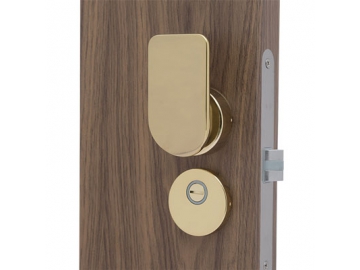
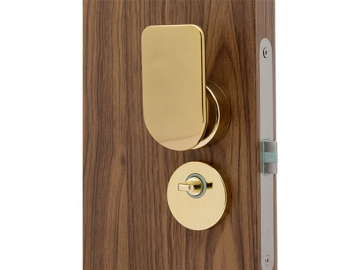
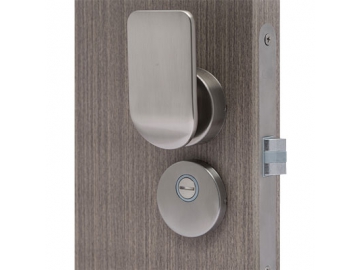
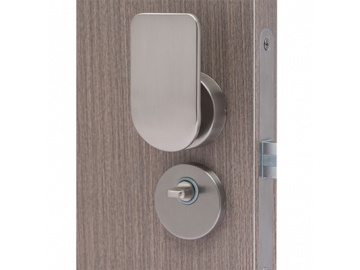
This type of push-pull mortise lock adopts a key less locking design. It could be locked with a knob from inside and unlocked with a coin from outside. When there is a state of emergency and the door is locked, it could be quickly unlocked from outside. The lock body shell is made of POM and the handle is made of aluminum alloy to ensure the firmness of the lock. The bolt is made of plastic POM and zinc alloy which reduces the noise and achieves a better mute effect. The appearance is stylish and uses a sleek design. The surface treatment adopts Japanese advanced technology. Various tests are carried out in accordance with Japanese JIS standards to ensure the durability of the lock both from the appearance and structure.
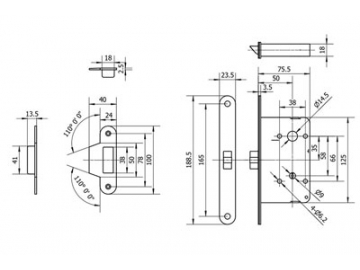
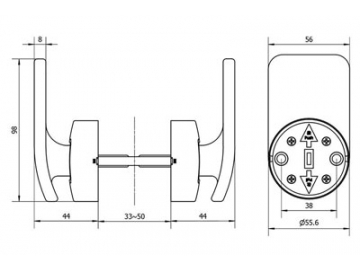
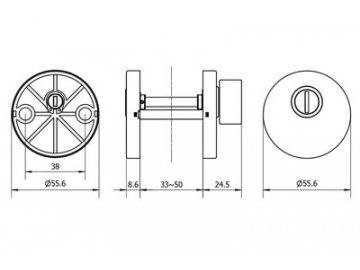
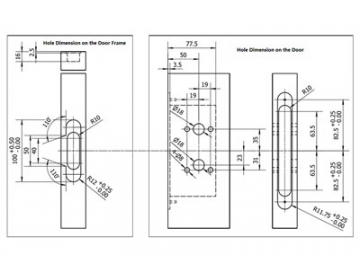
Dimensions
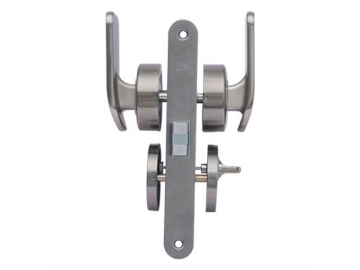
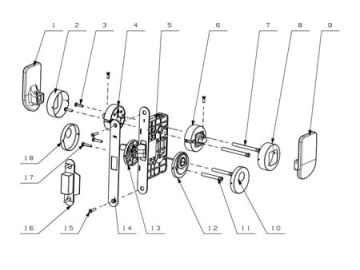
Parts List
| No | Name | No | Name |
| 1 | Inner Lever Handle | 10 | Outer Knob Panel |
| 2 | Inner Panel for Lever Handle | 11 | Connecting Screw Bolt |
| 3 | Screw for Lever Handle | 12 | Outer Knob Holder |
| 4 | Inner Holder for Lever Handle | 13 | Inner Knob Holder |
| 5 | Lock Body | 14 | Plate for Lock Body |
| 6 | Outer Holder for Lever Handle | 15 | Screw for Lock Body |
| 7 | Connecting Screw Bolt | 16 | Striking Box |
| 8 | Outer Panel for Lever Handle | 17 | Screw for Knob |
| 9 | Outer Lever Handle | 18 | Inner Knob Panel |
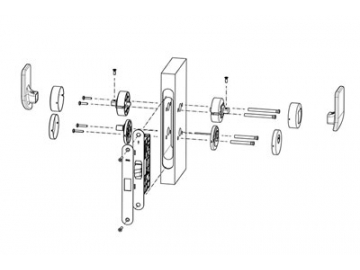
Installation Instructions
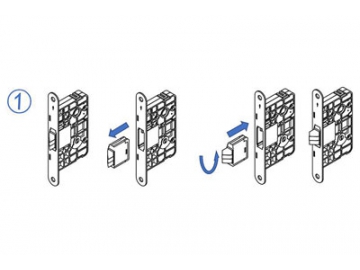
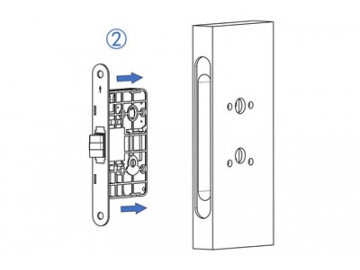
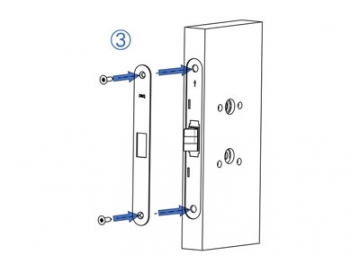
- Determine which direction the door will open. Place the lock body (arrow pointing upwards) into the set hole and ensure the latch bolt’s inclined surface is facing the door close direction. If the direction of inclined surface is wrong, pull the latch bolt out of lock body and rotate it by 180°. Then insert it back into the lock body. Install the front plate and tighten the screws.
- Inward opening door: push from the outside and pull from the inside. After installing the push-pull escutcheon panels, install the lever handles (screw attachment hole facing up) then tighten the screws.
Outward opening door: push from inside and pull from outside. After installing the push-pull escutcheon panels, install lever handles (screw attachment hole facing up), then tighten the screws.
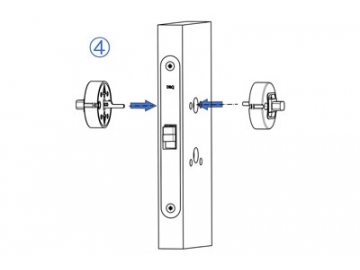
(*Notice when installing push and pull escutcheon plates: make sure the push arrow faces upwards on push plates, and the pull arrow faces upwards on pull plates.) - Install cylinder thumb turn plates with knobs. Connect the inner plate with a flat bar through the lock body flat hole to the outer plate, then tighten the screws.
- Install the striking plate on the corresponding position of the door frame and make sure that latch bolt and dead bolt can move in and out freely
- Test after installation
(1) When the knob vertical, the window displays green (if there is a display window). Push/pull the lever handles and press the latch bolt with your hand in the inclined surface direction. The latch bolt should freely turn over and easily be pressed into and removed from the lock body. When the latch bolt is pressed without pushing/pulling the lever handles, the latch bolt will not turn over.
(2) When the knob faces a transverse direction, the display window is red, indicating the locked status. At this time, no matter if the lever handles are pushed or pulled, the latch bolt will not turn over when pressed.
(3) If the latch bolt operates correctly, installation is complete. If not, reset all components.
Related products


Send Message
Other Products


Most Recent


More
")
")


Other Products


Videos


