Installation and Operation for Kelly Bar


Before assembly and disassembly of Kelly bars, you have to find an open, flat and hard ground, and put cross ties under the bar to keep it away from the ground. These drilling rig components can not be directly put on the ground and should be kept away from anything that may enter them including slag, marvel, etc.
When disassembling, you can not dismantle the sections until you remove the sleeve over them. If you directly remove the section, disassembly will not work normally due to the blocking by sleeve. This may even damage the internal key of next section. You had better mark the assembly direction or process using oil paint to make it easy.
Before assembly, you have to check each section and ensure there are no impurities in it that may impact the assembly, making it unsmooth or stuck. After assembly of each section, please do a stretch test along the drilling direction to see the telescopic situation. If there is an abnormal situation, stop assembling and clearly mark the abnormal part and then dismantle it to check what the matter is. Continue to assemble as the abnormal situation is removed.
Note: Rude assembly without concern about the abnormal situation is prohibited.
1) Installation
Refer to this operating manual and installation standards of drilling rig manufacturer to correctly connect each part and component. Lift the Kelly bar as the picture shows and fit it on the drilling rig.
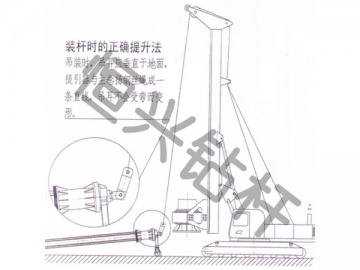
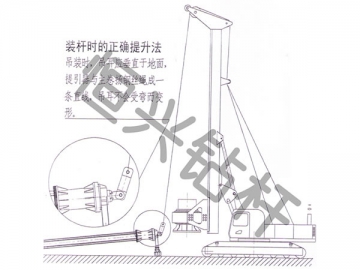
Right Lifting Method when Installing Kelly Bar:
When lifting, the lifting ear should be perpendicular to the ground and the swivel and lifting wire rope should be kept in a straight line to protect the lifting ear from being deformed.
2) Drilling Rig Status Adjustment and Attentions before Drilling
a. The ground should be flat and hard so as to ensure the continuous track of drilling rig can be free from partially getting into the ground. Because, in that case, the mast may tilt on all sides, resulting in inclined hole. In the inclined hole, the Kelly bar will subject to pressure to deform or break.
When the hole is not straight, each section of Kelly bar will have a certain bending deflection. Then, the rotary drive exerts torsion on the bar and makes it seriously bent (At this time, each section is stuck due to serious bending and can not stretch flexibly.) Because of bending, the Kelly bar will suffer from plastic deformation that can not be recovered. As the bar is seriously bent, the external drive key will break. Without in-time repair, the Kelly bar shell will be broken. (As shown in the figure below)
Kelly bar status in inclined hole; As pressed, the Kelly bar breaks in inclined hole
Figure I: Part of the second section is stuck in the bottom of the first section
Figure II: Part of the third section is stuck in the bottom of the second section
Figure III, IV: Part of the fourth and fifth sections is stuck in the bottom and the third and fourth section
Figure A: External drive key of the third section is ruptured due to bending; The third section body breaks
b. As the drilling rig has worked for a certain time, please check whether each support cylinder works normally or not so as to prevent inclined hole.
c. Kelly bar and drilling tool should be firmly connected to avoid pin falling and prevent drilling tool dropping into the hole.
A. Interlocking type Kelly Bar
a. Rotary table turns, keeping the drilling tool right on the hole position and making sure that the Kelly bar keeps vertical during the whole drilling process.
Before drilling, adjust the Kelly Bar and make it vertical to the ground.
b. When lowering the Kelly bar down into hole, you must rotate the drive slowly to prevent the wall of hole rubbing the drilling tool and avoid sudden fall.
As interlocking Kelly bar is lowering, the rotary drive should keep counter-rotating slowly;
As interlocking Kelly bar is lowering, the rotary drive can not rotates along the rotation direction of Kelly bar.
c. When the drilling tool reaches the bottom of the hole, further drilling can not begin until all sections of the Kelly bar are locked. Operate the rotary drive to rotate slowly. The Kelly bar transfers the torque from the rotary drive to the drilling tool and makes it rotate to drill.
d. Unlocking and lifting steps:
Unlocking step one:
Lift the rotary drive upward by 10-20cm. As drilling work finishes, firstly lift the rotary drive upward by 10-20cm to relieve pressure and recover the Kelly bar to vertical state.
Unlocking step two:
Keep the rotary drive counter-rotating slowly and continue to lift it by 20-30cm. This is the preliminary unlocking step, and some section may be still interlocked. At this time, direct lift using hoist winch is not allowed.
Unlocking step three:
After doing step two, keep counter-rotating the rotary drive slowly and press it down by 30-40cm. This is to fully unlock the Kelly bar.
Unlocking step four:
Keep the rotary drive counter rotating slowly and use winch to lift the Kelly bar until the drilling tool can be seen.
Note: The rotary drive rotates slowly in the whole lifting process. This is to avoid self interlocking of sections during lifting.
At this time, operator should observe the pressure gage of the winch and listen to how the motor power changes to judge whether there is obvious overload or not. If it is overloaded, the bar is not unlocked completely. Operator has to lower down the bar to the bottom of hole and unlock again according to the steps.
e. Lift drilling tools out of the hole and remove earth on it.
f. Circulating
B. Friction Type Kelly Bar
a. Rotary table turns, keeping the drilling tool right on the hole position and making sure that the Kelly bar keeps vertical during the whole drilling process.
b. Operate the rotary drive to rotate at a proper speed. The Kelly bar transfers the torque from the rotary drive to the drilling tool and makes it rotate to drill.
Note: According to different stratums, it can not exceed 1m when using rotary drive to continuously pressurize.
c. Use winch to lift the Kelly bar and drilling tool out of the hole.
d. Remove earth
e. Circulating until a drilling hole is formed.
Methods used to avoid or reduce slipping phenomenon:
① Before each drilling, rotate the rotary drive clockwise to open the feed port of drilling tool;
②When drilling into the earth, the bucket should not be fully filled. 70% or 80% is great;
③Weld spring steel pate on the worn tooth to extend it;
④ Change drilling tool, such as spiral drill tool;
These methods should be used according to actual situations. Appropriate method can be used to improve drilling efficiency.


")


